SharePoint – How To Export To Excel
- 29/08/2017
- Posted by: Sheryl Newman
- Categories:

“Can you export this to Excel?”. You will not believe how many times we get asked this during the course of a SharePoint development project!
As a Microsoft product, SharePoint has a natural association with Excel, so much so that almost any content stored within your SharePoint site can be easily exported to Excel. So here’s a brief explanation as to how this can be achieved.
How do I export from SharePoint to Excel?
Lets show you how to do it:
1. Firstly, make sure you are using Internet Explorer Browser, export to Excel does not work from other browsers such as Google Chrome or Safari.
2. Go to the list you want to export to Excel (i.e. Calendar).
3. Navigate to the view you would like to export. The way it works with export to Excel is very much, what you see is what you get! In other words, if you are exporting a particular view and you only see 5 columns, SharePoint will only export those 5 columns into Excel. Therefore, if you are looking to export an entire list (database), make sure you have all the columns visible in your view (i.e. All Items View). Also ensure your view is not grouped! (Grouped columns will not be exported to Excel).
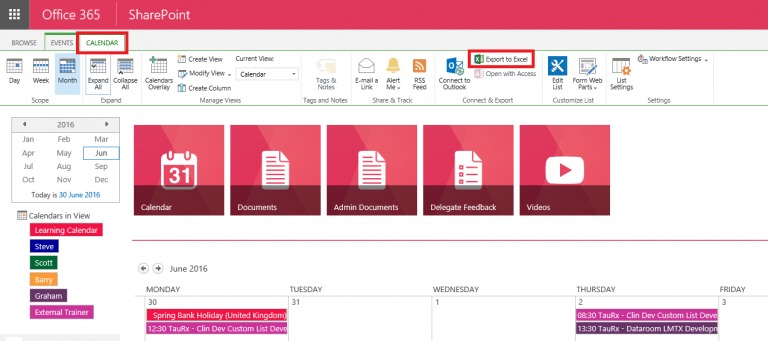
4. Click on the List tab and select Export to Excel found in the middle of the ribbon, see below:
How to Export from SharePoint to Excel
Any information contained in a list can be exported to Excel, this includes the following Out of the Box web parts:
1. Contacts
2. Calendar
3. Tasks
4. Issues
5. Custom List
6. Discussion Board
7. Document Library
Now the last one in the above list you might think is a little strange but yes, you can in fact export document libraries (metadata, not the actual files) to Excel, since they too are also lists.
Note: The List tab terminology might change depending on the type of list you are exporting from. For example, the List tab when looking at a Calendar will display the term Calendar, as shown below:
5. Now you might get a warning message from the browser at this point, don’t panic – just click OK or proceed.
6. Excel will open, yet again you might get another warning, if you do – just click Enable
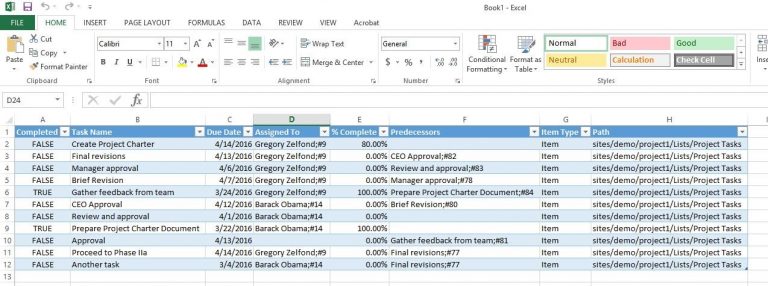
7. Upon completion, Excel will open up to display your data export. It really is that easy!
How Do I Refresh the Data in Excel without doing another Export to SharePoint
One important thing to know about export to Excel is that the Excel file you export to maintains a connection to SharePoint. This means that any changes you make to the list in SharePoint will be applied to your export file. This is not done automatically. In order to see the changes made to the SharePoint list, in Excel, you have to refresh your Excel export file. Here’s how you do this:
1. Looking at your Excel export file click on the Data Tab, then Connections:
2. On the dialogue box that appears, click the Refresh button, then Close:
3. Your data has now updated in Excel.
This refresh functionality is extremely powerful when building pivot tables, charts, etc., especially if you want to update your Excel spreadsheet to include any recent changes made to your SharePoint list. By simply clicking the Refresh button, you can refresh your Excel spreadsheet to include the latest information without having to worry about losing any formatting applied to your Excel spreadsheet.
Note: The connection between SharePoint and Excel is 1-way. In other words, information flows form SharePoint to Excel, not the other way around! Any changes you make in Excel are not reflected in SharePoint. Once you click on Refresh, SharePoint will overwrite whatever you did in Excel.
How do I Break the connection between Excel and SharePoint?
Unless you specifically refresh using the instructions above, your data in Excel will remain as it was at the time of the export. If, for whatever reason, you would like to permanently remove the connection to SharePoint, you can do the following:
1. From Excel, click on the Data Tab, then Connections:
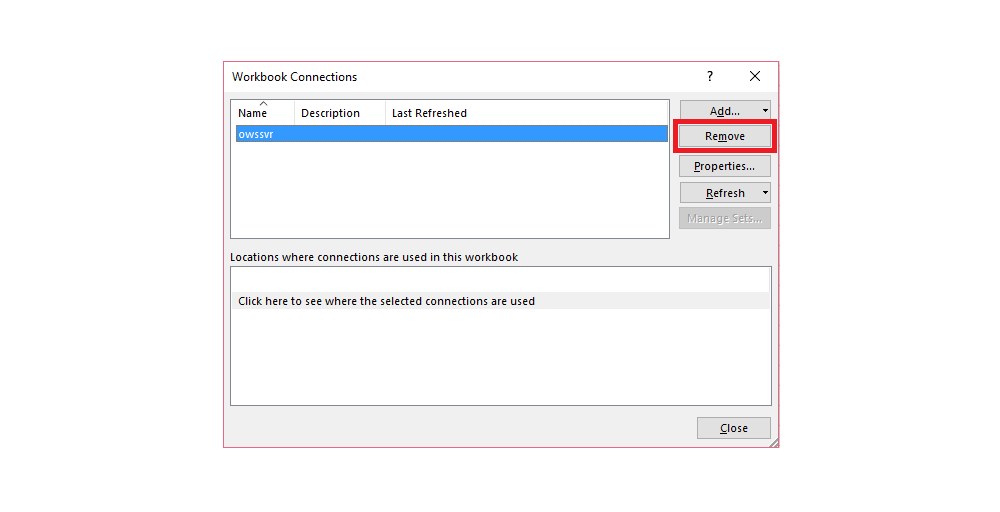
2. On the dialogue box that appears, click Remove:
3. On the warning message that appears, click OK:

For more SharePoint tips have a look at our insights.


